***Tutorial by Sneaky Momma Blog Design***

Wondering how to get a bigger border around you image? Well here's the simple tutorial on how!
To put a border around the images in your posts:

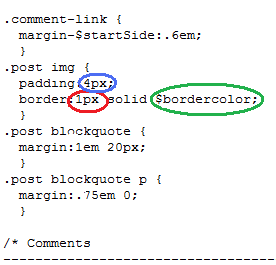
1. Find the .post img { section within the HTML of your template. It is located towards the bottom of the posts section and above the main comments section. You can find it by typing Ctrl+f on your keyboard :)
2. Modify the width of the border (circled in red above) to your liking (the higher the number, the thicker it will be). The width of my border is 8px.
3. Change the $bordercolor; (circled in green) to #000000; (or whatever color you‘d like. Click here for a list of color hex codes.) #000000; is black.
4. Preview and save.
Fun, and easy! This tutorial will really make all your photos pop! Tell me if you did it!


Hey, Emily!!! I did it! I think it looks really cool, too. Also, I figured out how to get rid of the border around the header and still keep the border around the picture! It's so neat. Thanks for the tutorial. I LOVE it!
ReplyDeleteThis is the link to my blog, if you want to check it out!
farmgirlinflipflops.blogspot.com
Tell me what you think. Thanks again!
I just added the picture border on my blog and I think it looks really cool. thanks for the lesson! I am learning so much!
ReplyDelete